
When I was in my previous role, we needed to find a chatbot service to use. We considered a few options like Crisp, Drift, Marketo, Salesforce, and Hubspot. Each had its own pros and cons, but in the end, we decided to go with Crisp. However, since the tool was new, nobody in my network had experience building with it. Considering the different implementation costs and onboarding processes offered by various companies, I thought we could try using ChatGPT to create the chatbot by providing it with the rules we used to build one.
In a previous article, we discussed training ChatGPT to act as your product specialist. In this guide, we'll walk you through the process of creating your own chatbot using Crisp and ChatGPT, with the exact prompt you need included. Whether you're a startup looking to improve your customer service, generate more inbound leads, or create compelling lead magnets, you'll find this guide incredibly helpful. You'll be amazed at how simple it is to implement this powerful combination of technologies without extensive coding.
So, whether you're an experienced tech guru, a beginner in the startup world, or somewhere in between, this guide is tailored for you. We'll break down the steps into easily manageable sections, so you won't have to worry about getting lost along the way.
What is Crisp?
Crisp, is a sleek and modern customer engagement platform designed to simplify communication with your customers. It’s a versatile tool used by startups and established businesses alike, providing a range of features that extend beyond its primary function as a chatbot platform.
Crisp offers real-time messaging, making it an ideal choice for providing instant customer support. It has robust chatbot capabilities, enabling automated replies to common queries, providing immediate assistance even when your team is offline. Along with these, Crisp also provides team inbox functionalities and a suite of marketing tools, making it more than just a chatbot platform.
In terms of pricing, Crisp maintains a competitive edge by offering a generous free tier, as well as affordable subscription plans. The free tier includes essential features like two seats, unlimited history, and basic integrations. The Premium plan introduces advanced features like unlimited seats, video chat, 50k contacts, co-browsing, and the coveted chatbot capability. This affordability makes it a go-to choice for startups operating with tight budgets but unwilling to compromise on quality and functionality.
When compared to other platforms like Drift, Marketo, Salesforce, or Hubspot, Crisp stands out in its simplicity and focus. While these other platforms are heavy-duty marketing automation tools, Crisp has a leaner and more specialized approach. It's focused primarily on chatbot functionality and customer engagement, instead of trying to be a jack-of-all-trades platform. This focus makes Crisp less overwhelming and easier to get started with, particularly for smaller businesses and startups.
Drift, for example, while well-known for its robust chatbot capabilities, often comes across as overkill for businesses just looking for a simple chatbot solution. Salesforce and Marketo, on the other hand, are comprehensive marketing platforms that come with a higher price point and a steep learning curve. Hubspot offers a wide range of marketing tools, but its chatbot function is just one piece of a much larger puzzle.
Crisp, with its focused toolkit, is like a breath of fresh air. It does one thing, and it does it well: creating and managing a chatbot for customer engagement. It offers just enough in terms of marketing tools and integrations to support its primary function without becoming bloated or overly complex.
This article focuses on one specific aspect of Crisp – its chatbot builder, and more specifically, how to use ChatGPT with Crisp to create a powerful, intelligent chatbot. As we progress through this guide, we’ll delve deeper into the nitty-gritty of using these platforms in conjunction to build a chatbot tailored to your startup's needs. We’ll provide step-by-step explanations, clear examples, and even a downloadable text prompt for you to follow along. It's time to harness the power of AI and improve your customer engagement strategy with Crisp and ChatGPT.
ChatGPT and Crisp – A Powerful Combination
By now, you should be quite familiar with the concept of using AI language models, specifically ChatGPT, as a tool to learn, implement, and provide solutions in a wide variety of domains. Here, we'll take that concept a step further by employing it in the chatbot-building realm, specifically using Crisp's chatbot builder.
At first glance, using a language model to create a chatbot might seem a bit convoluted, but it’s quite the opposite. ChatGPT's learning abilities allow us to train it with the rules we've used in the past, making the process of building a chatbot simpler, quicker, and more efficient.
The key to this process lies in providing ChatGPT with detailed rules and instructions surrounding the structure and functionality of Crisp's chatbot builder. This could involve a detailed explanation of the features and functions of each block in Crisp's chatbot builder, along with examples of their usage. With this knowledge, ChatGPT would be able to understand the intricacies of the tool and provide step-by-step instructions based on a given user query.
The newer chain of thought prompting feature, which allows ChatGPT to maintain context over longer conversations, makes this process even smoother. For instance, you could provide ChatGPT with a brief, high-level description of what you want your chatbot to accomplish - something like, "I need a chatbot that greets the user, asks them about their preferred product category, suggests some products based on their response, and collects their contact information for follow-up."
Once this high-level prompt is given, ChatGPT will examine it in the context of the earlier training surrounding Crisp. It will then provide a step-by-step guide on how to build the required chatbot, including which blocks to use, what conditions to set, and how to frame the responses. All this happens without you needing to get into the weeds of coding or flowchart building.
This is particularly useful if you’re new to chatbot building or if you want to create complex chatbot flows without getting bogged down in details. It significantly reduces the time and effort required to build, test, and deploy a chatbot, allowing you to focus on other aspects of your business.
Detailed Breakdown of Crisp's Chatbot Blocks
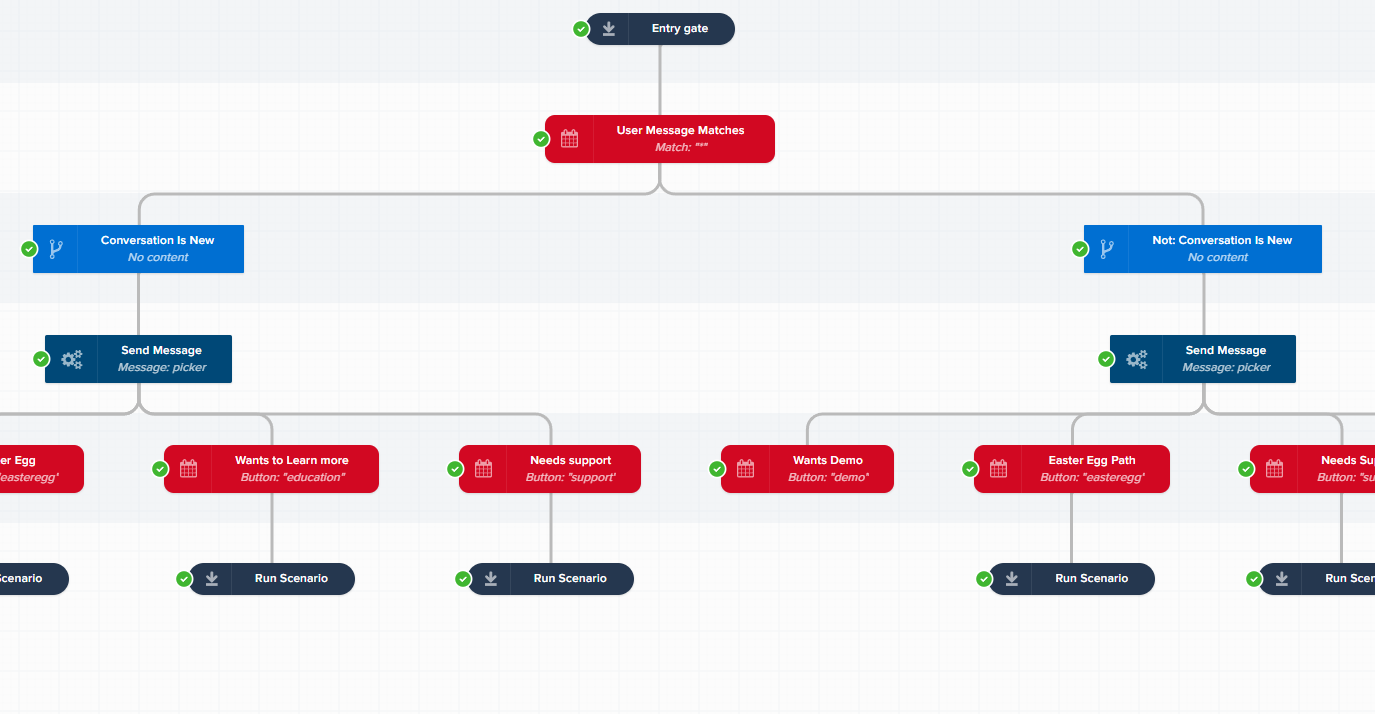
In order to understand the process of creating a chatbot with Crisp, it's essential to get to grips with the three main building blocks at your disposal: the "Insert an Event" block, the "Insert Condition Block", and the "Insert Action" block. Each one of these serves a unique purpose in the chatbot creation process, allowing you to set triggers, conditions, and actions that dictate how your chatbot interacts with users. In this section, we will break down each block in detail to help you better understand their functions.
Understanding the "Insert an Event" Block
The "Insert an Event" block is the starting point of any conversation. It specifies what should trigger the chatbot to respond. The options available within this block are diverse, ranging from events such as a user visiting a webpage, a user sending a message, the bot sending a message, a visitor being assigned to an operator, and more. It's important to understand that an event triggers a response from the chatbot. Depending on your requirements, you can select from the available options to initiate a conversation.
"Insert an Event" Block Options
1.a On campaign trigger: This triggers the chatbot when a visitor starts a specific campaign. You can define the campaign in the sub-option.
1.b On page visit: Use this option to start a chatbot when a user visits a specific page. You can enter the URL of the webpage in the sub-option.
1.c On message sent by user: This is probably the most used trigger. It starts the chatbot when a user sends a message. You can specify the text that should trigger the chatbot in the sub-option.
1.d On message sent by bot: This option triggers the chatbot when it sends a specific message. The sub-option lets you specify the exact message.
1.e On user email received: The chatbot starts when a user's email is received.
1.f On user phone received: Similar to the email trigger, the chatbot starts when a user's phone number is received.
1.g On operator reply: Use this trigger to start the chatbot when an operator replies to the chat.
1.h On conversation assignation: This trigger starts the chatbot when a conversation is assigned to a specific operator. You can define the operator in the sub-option.
1.i On user becomes online: The chatbot is triggered when the user goes online.
1.j On user becomes offline: Contrary to the previous trigger, this one starts the chatbot when the user goes offline.
1.k On user seen: The chatbot starts when a user sees a message. You can specify the message in the sub-option.
Knowing how to work with these triggers effectively can greatly enhance your chatbot's ability to engage with visitors. Once you've established what events you want to trigger your chatbot, you can then focus on creating conditional responses and actions to make your chatbot more interactive and dynamic. This is where our next block, the "Insert Condition Block", comes in. In the following section, we will delve into the options it presents and how to utilize them effectively.
Mastering the "Insert Condition Block"
The "Insert Condition Block" allows the chatbot to make decisions based on the user's input or other predefined conditions. Essentially, this block is used to analyze the context and determine the appropriate response. The conditions available range from the type of the visitor (new or returning), the device used, the URL visited, to whether the visitor has been assigned to an operator or not. By understanding these conditions, you can create a chatbot that provides personalized responses based on the user's behavior or input.
"Insert Condition" Block Options
2.a Check if a user message matches: This condition checks if a user message matches the specified criteria. This is particularly useful for specific questions or keywords.
2.b Check if a user email is defined: Checks if the user has provided their email address. It's beneficial when you want to follow up or require contact details.
2.c Check if a user phone is defined: Similar to email, this condition checks if a user has provided their phone number.
2.d Check if a visitor is in office hours: This condition is useful for businesses operating within specific hours. It checks if a visitor is interacting during those hours.
2.e Check if a user has already seen a campaign: Determines whether a user has already seen a specific campaign.
2.f Check if a user is on a specific URL: This condition verifies if a user is currently on a specified webpage.
2.g Check if a user is from a specific country: Verifies the geographic location of a user based on the country.
2.h Check if a user speaks a specific language: Determines the user's language to provide language-specific responses.
2.i Check if a user is browsing from desktop or mobile: Identifies the device type a user is using, i.e., desktop or mobile.
2.j Check if a user is browsing from a specific browser: Identifies the browser a user is utilizing.
2.k Check if a user is browsing from a specific OS: Determines the operating system a user is using.
2.l Check if a user is new: Identifies if the user is new to your website or a returning visitor.
2.m Check if a user is in a segment: Verifies if a user belongs to a specific segment.
2.n Check if a user has a specific attribute: Checks if a user has a specific attribute, for example, a subscription to a newsletter.
2.o Check if a user has received a specific email: Verifies if a user has received a particular email from your business.
2.p Check if a user has clicked on a specific email: Identifies if a user has clicked on a specific email you have sent.
2.q Check if a user is currently browsing your website: Determines whether a user is currently browsing your site.
Utilizing the "Insert Action" Block
The "Insert Action" block is where the chatbot performs an action based on the event and condition blocks. Actions can include the chatbot sending a message, suggesting an article, subscribing the visitor to a campaign, assigning the visitor to an operator, and more. Essentially, this block determines how the chatbot responds to the event and condition blocks.
"Insert Action" Block Options
3.a Send a text message: Your chatbot can send a predefined text message. This can be anything from a simple greeting to detailed instructions.
3.b Send a rich message (choices): This action allows your bot to send interactive messages. Users can select from predefined options, helping to guide the conversation.
3.c Send a rich message (forms): Your bot can send forms to gather more detailed information from the user.
3.d Send a delay: This action introduces a delay before the next message is sent, making the conversation feel more natural.
3.e Send a private note: Your bot can create a private note, visible only to the team and not the user.
3.f Set user attribute: This action sets a specific attribute to a user, useful for categorization and future interactions.
3.g Set user segment: This action assigns a user to a particular segment, helping to organize your user base for targeted conversations.
3.h Set user data: This action lets your chatbot collect and store user information, such as email or phone number.
3.i Set user block: Your bot can block a user. This is helpful in managing abusive or spamming users.
3.j Trigger a campaign: This action allows your bot to trigger a specific marketing campaign based on the user's interaction.
3.k Send an email: Your bot can send an email to a user. This is handy for follow-up communication or delivering resources.
3.l Redirect user to a URL: Your bot can redirect users to a specific URL. This is useful for guiding users to resources or specific pages.
3.m Resolve a conversation: This action allows your bot to close a conversation, indicating the query has been resolved.
3.n Qualify a conversation: This action marks a conversation as qualified, indicating it's valuable or has reached a certain stage.
3.o Assign a conversation: Your bot can assign a conversation to a specific team or team member.
3.p Trigger a Zapier Zap: This action triggers an action in Zapier, allowing for extensive integration with other tools.
By strategically placing these conditions, you can create an intelligent, responsive chatbot capable of navigating complex conversation paths. Keep in mind, the best use of these conditions depends on the specific requirements of your business and the goals you have for your chatbot.
Remember, the key to creating a successful chatbot lies in understanding how these blocks work together. The event initiates the conversation, the condition sets the context, and the action determines the chatbot's response. With this knowledge, you'll be able to train ChatGPT to create your own chatbot with minimal effort.
Capturing User Data with Crisp
A crucial aspect of any chatbot experience is data collection. By gathering essential user data, businesses can personalize interactions, streamline user experiences, and inform future marketing efforts. With Crisp, the process of data collection is both seamless and efficient, ensuring your chatbot can provide both value to the user and insightful data to your team.
Let's break down how to implement this in Crisp:
Step 1: Understanding User Data Capture Blocks
In Crisp's chatbot builder, the primary mechanism for data collection is the "Capture User Data" block. This block comes with several sub-options, each representing a different type of data you might want to collect, such as name, email, phone number, date, and more. You select the type of data to collect, and the block will automatically generate a user input field for that data type when the chatbot reaches this stage of the conversation.
Step 2: Position Your Capture Block
Before inserting a data capture block, it's important to plan its position carefully. The chatbot should first establish a rapport with the user and explain why it needs the data before asking for it. Thus, the capture block should be inserted after a few introductory exchanges and a clear explanation of its purpose.
Step 3: Configure the Capture Block
Once you've chosen the position for the capture block, you can set its parameters. These parameters define how the chatbot will ask for the data, how it will respond to the user's input, and what it will do if the input is invalid. It's crucial to set these parameters thoughtfully to make the data collection process smooth and user-friendly.
Step 4: Saving and Using the Captured Data
The data captured by the chatbot is automatically saved in the user's profile within the Crisp dashboard. This data can then be used to personalize future interactions with the user. For example, the chatbot could address the user by name or refer to their previous product choices during subsequent conversations.
Capturing user data is a delicate process that requires a thoughtful approach. But with Crisp's flexible chatbot builder and user-friendly data capture blocks, you can make it a natural and seamless part of your chatbot interactions. The information you collect will not only enhance your users' experience but also provide valuable insights to help grow your business. In the next section, we'll put all these elements together and walk you through an example of creating a chatbot using Crisp and ChatGPT.
Lets build a Support Chatbot
Let's put theory into practice by creating a simple support chatbot using Crisp and ChatGPT. This chatbot will pull a copy of the help desk, give suggestions, check the business hours and either ask the user to email or push to live support.
Step 1: Outlining the chatbot’s behavior
First, we need to provide ChatGPT with the rules that the chatbot will operate under. If you read our article titled "Save Setup Fees: Train ChatGPT as your Product Specialist" we could go about this by using a pdf, or in this case typing the rules for the program.
Feel free to use the following prompt to cut down on the typing time:
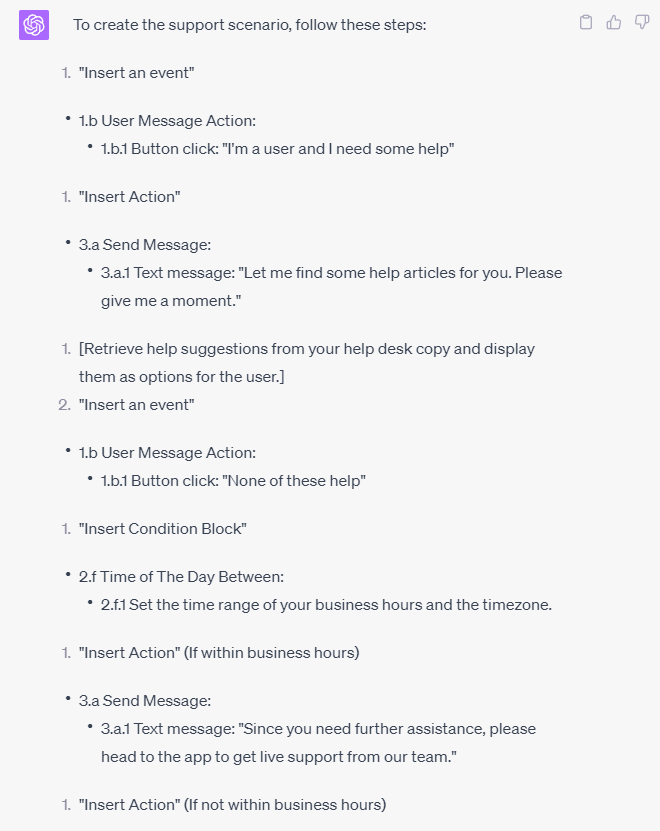
Once we have these rules defined, we provide them to ChatGPT, which will generate a detailed guide on how to build this chatbot using Crisp.
Step 2: Generate Crisp setup guide with ChatGPT
Lets ask ChatGPT for a step by step guide. My prompt is to ask for a support scenario:
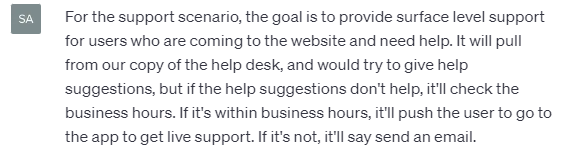
Prompt
For the support scenario, the goal is to provide surface level support for users who are coming to the website and need help. It will pull from our copy of the help desk, and would try to give help suggestions, but if the help suggestions don't help, it'll check the business hours. If it's within business hours, it'll push the user to go to the app to get live support. If it's not, it'll say send an email.
The end result? ChatGPT will then provide the step-by-step guide based on its understanding of Crisp's functionality.
Step 3: Implement the Guide in Crisp
Next, you'll use the guide generated by ChatGPT to set up the chatbot in Crisp. Follow the steps closely, paying attention to each block and the flow of the conversation. Remember to test your chatbot thoroughly to ensure it behaves as expected.
Step 4: Iteration and Improvement
Once your chatbot is live, monitor its interactions with users. You might find certain areas that need tweaking or improving, based on real-life user behavior. You can then provide this feedback to ChatGPT, which can guide you on how to adjust the chatbot setup in Crisp to achieve the desired results.
This example illustrates how the power of Crisp and ChatGPT can be combined to create a simple yet effective customer service chatbot. However, the possibilities are endless. With this powerful combination, you can create chatbots that do much more than just route users to the right department. I myself used it to build an entire lead magnet that is capable of categorizing, educating, and automating leads for my previous company. They can handle complex queries, gather leads, provide personalized product recommendations, and much more. All it takes is a clear set of rules and the power of ChatGPT and Crisp to bring your vision to life.
The Takeaway
The beauty of this approach lies in its scalability and adaptability. Whether you're a small startup or a large corporation, whether you aim to solve simple queries or handle complex multi-turn conversations, the Crisp and ChatGPT combination can be tailored to your needs.
In conclusion, using Crisp and ChatGPT is a powerful and user-friendly approach to chatbot creation. It doesn't demand extensive coding skills or a large investment of time. It's about utilizing the power of AI and straightforward user interfaces to transform your customer interactions, delivering exceptional customer service, and, ultimately, driving your business forward. Happy prompting!